SOCIAL MEDIA

Showing posts with label Tutorials. Show all posts

July 2, 2012

Baby wipe case tutorial


Have you seen or heard about "Bitatto"?
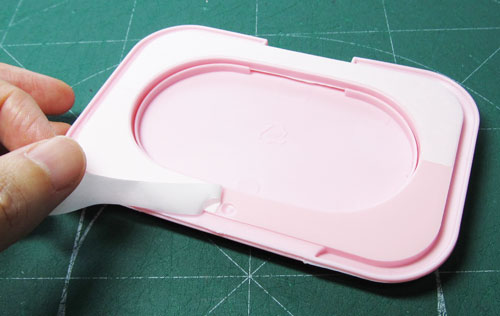
A method of use is just remove the film sheet of the lid and stick it to commercially sold baby wipe case.

I will introduce how to make your own baby wipe case using "Bitatto".
You will need...Laminated fabric 30cm×50cm cut,  30cm coil zipper, Bitatto, Glue.

1. Cut to H27cm×W41cm. Mark position of line A, B & C to wrong side as below.

2. Trace an oval shape of Bitatto to the center of the wrong side.

3. Cut an oval shape out.

4. Fold line "A" of one side as below. Press with your fingers to make a crease.

5. Sew folded edge at 1mm from the edge.

6. Fold line "B" of one side same as step4. Then sew folded edge as step5. Repeat it for the other side.

It will look like this.


7. Fold line "C".

8. Attach the long side of "C" to the zipper like images. Then sew folded edge at 2mm from the edge.

9. Repeat it to the other side.

10. Cut off the extra zipper. Please make sure that zipper slider is in the middle before do this.

11. Binding both sides. Bias tape : Two 4cm×14cm
sew at 1cm from the edge


fold the raw edges to inside like this

topstitch to finish binding

12. Make flap. Trace flap of Bitatto as below. Then cut it out.


13. Apply glue to the whole flap outside of Bitatto.

14. Place the fabric piece on it.

15. Remove the seal.
16. Apply glue around the adhesive side.

17. Attach it to wipe case as below. Match the hole of Step3.

18. Please stretch wrinkles with your fingers as below.

19. Remove the film sheet of the lid. Put bag of baby wipes into the case.


Let's make your own baby wipe case!

Converter

cm
feet
inch
Note: 1 Inch = 2.54 cm, 1 Feet = 30.48 cm, 1 Feet = 12 Inch
This free script provided by
JavaScript Kit

May 29, 2012

How to add numbering comments in Blogger?

When I was going to count the number of comments of Giveaway, the numbered comments had disappeared unawares.
I was searching for many sites, finally I found the solution!
Probably, it is solvable here, if you are looking for this solution as well as me.

Go to Template → Customize → Advanced → Add CSS → Paste the following code → Press enter after the last character of the last line → Apply to Blog


Check your comments and these numbers will appear left of visitor's name.:)

June 24, 2011

New Key Fob with Zipper


I made some key fobs using by zipper.
Recently I'm spending a time for make something using by zipper (o`・∀・´o)yes!!
It really is fun to make it with zipper!
It looks very gorgeous!
I used heavy weight interfacing tape inside. So there are very durable. They don't loose shape when you hold.

Let's try to make it!!

Material : Metal zipper 19cm(already cut off top end stopper and removed slider)
                Cotton fabric 4cm × 19cm
                Heavy weight Iron-on interfacing tape 2cm × 19cm
                Key fob hardware 2"


1.Make 2 webbings
  apply iron-on interfacing to the wrong side of focus fabric


2.Sew the zipper to webbing
  Please see here how to attach the zipper to webbing


3.Fold webbing and stitch the end together


4.Attach the key fob hardware


5.DONE!!


June 16, 2011

Zipper Bow - Tutorial -


This Zipper Bow is really easy to make and you can add to bags,hats,brooches or use to interior.
I am decorating the bookshelf with it.

I want to explain how to make it by using the photograph since now and I hope that you share it.
I'm sorry if my English make you feel bad -- it is not on purpose. Please understand that there is no offence.
I hope strongly that photograph can help you .


Materials: Metal zipper 30cm
                Tyrolean tape 56cm × 2.6cm(width)
                * Also you can use any fabric*


1: Cut off top end stopper and remove slider.


2: Cut tyrolean tape in 28cm. Then cut to 20.5cm and 7.5cm(×2)


3: Cut zipper as shown in the below.


4: Turn the zip teeth outside and tyrolean tape placed on zipper. It's RIGHT SIDE.


5:  Sew both sides. Seam allowance about 0.2cm.


6: Another tyrolean tape placed on zipper. It's WRONG SIDE.


7: Sew both sides the same as 5.


8: Sew both ends together by hand.


9: Squeeze the thread.


10: Make the center of Bow.


11: Match on both side of zipper.


12: I used center of tyrolean tape. Fold both sides.


13: It placed on zipper looks like below.


14: Sew both sides the same as 5.


15: Fold to wrong side.


16: Sew extra tape and stopped.


17: Sew lightly to add.


18: Sew the end tightly by slip stitch.


19: FINISH!!


* You can attach this brooche pin to bow.


cm

feet

inch

Note: 1 Inch = 2.54 cm, 1 Feet = 30.48 cm, 1 Feet = 12 Inch
This free script provided by
JavaScriptKit


Thank you for reading until the end.
I am pleased if you try to make this Zipper Bow from my tutorial.
I'm making another thing using by the zipper. Next one is SUPER simple.
Please come back again!


If you have any questions,feel free to contact me.